

How to Make Homemade Pain Relief Cream
Table of Contents
- What You'll Need: Ingredients and Equipment
- Understanding the Science Behind Pain Relief Ingredients
- Step-by-Step Instructions for Making Homemade Pain Relief Cream
- Safety Precautions for Homemade Topical Analgesics
- How to Store Homemade Skincare Products
- Natural Alternatives to NSAIDs for Pain
- Common Mistakes to Avoid When Making Pain Relief Cream
- Frequently Asked Questions
Last Updated: September 3, 2026
What You'll Need: Ingredients and Equipment
Making homemade pain relief cream requires gathering active ingredients and carrier bases that work together to create an effective topical remedy.
Essential Ingredients:
The foundation starts with carrier oils. Coconut oil provides a stable base with natural anti-inflammatory properties, while shea butter adds richness and helps absorption without greasiness. Beeswax pellets act as an emulsifier and thickener. Use roughly equal proportions, about one-third of your final volume for each.
Active ingredients provide therapeutic power. Capsaicin, derived from cayenne pepper, creates the warming sensation in many commercial pain relief products. Essential oils like peppermint, frankincense, myrrh, and ginger oil add anti-inflammatory and soothing properties. Ginger oil has been used traditionally for joint pain and muscle soreness.
Equipment You'll Need:
A double boiler is essential, never melt beeswax directly over heat, as it can overheat and lose potency. Use glass mixing bowls, a reliable thermometer, measuring spoons and cups, and an electric hand mixer or whisk for achieving the right consistency during cooling.
Dark glass storage jars with tight-fitting lids preserve your finished cream by protecting it from light degradation. Clean, sterilized utensils prevent contamination.
Understanding the Science Behind Pain Relief Ingredients
Understanding how specific compounds interact with your skin helps you make better decisions about ingredient ratios and application techniques.
How Capsaicin and Essential Oils Work
Capsaicin is the active alkaloid in hot peppers that creates a burning sensation. When applied topically, it triggers TRPV1 receptors in nerve endings, initially causing warmth, then leading to desensitization that reduces pain signals (peer-reviewed research). This is why capsaicin-based creams are effective for arthritis relief and muscle soreness, the pain relief is a documented neurological response, not imagined.
Essential oils work through different pathways. Peppermint oil contains menthol, which activates cool-sensing receptors, creating a counter-irritant effect that distracts from underlying pain (peer-reviewed research). Frankincense and myrrh contain compounds with documented anti-inflammatory properties. Ginger oil works similarly to capsaicin but through a gentler mechanism, making it suitable for sensitive skin.
These ingredients actively reduce inflammation or modulate how your nervous system perceives pain signals, rather than simply masking pain.
Why Carrier Oils Matter
Carrier oils are the delivery system that determines how effectively active ingredients penetrate skin. Coconut oil has a molecular structure that allows deeper penetration, carrying active compounds closer to inflamed tissues. Shea butter provides additional emollient properties and locks in moisture, particularly important for irritated or sensitive skin.
The ratio of carrier oils to beeswax determines absorption rate. Too much beeswax creates a product that sits on skin without penetrating; too little leaves an oil that doesn't maintain consistency. The 1:1:1 ratio of coconut oil, shea butter, and beeswax creates a cream that absorbs within 5-10 minutes while maintaining structural integrity.
Unrefined versions of these oils retain more natural compounds and deliver better results, though they require more careful storage to prevent rancidity.
Step-by-Step Instructions for Making Homemade Pain Relief Cream
Step 1: Prepare Your Equipment and Workspace
Sterilize all equipment by washing glass bowls, jars, and utensils with hot soapy water, then dry completely. Set up your double boiler with water in the bottom chamber.
Measure out your ingredients before beginning: 1/3 cup coconut oil, 1/3 cup shea butter, and 1/3 cup beeswax pellets. Keep essential oils and cayenne powder separate for later addition. Have your thermometer, whisk, and storage jars within arm's reach.
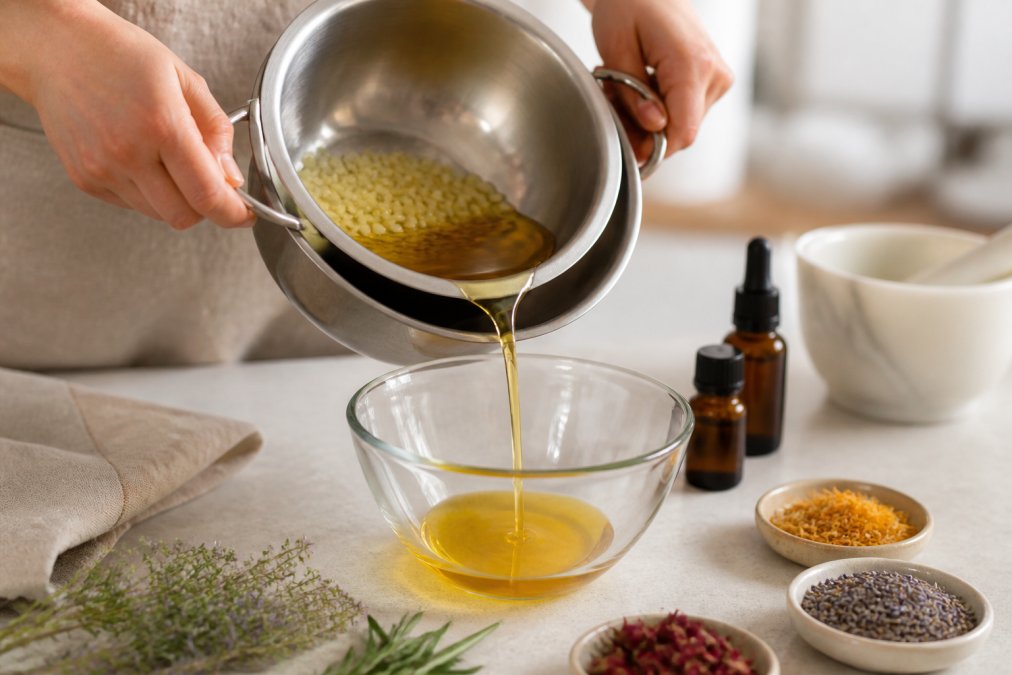
Step 2: Melt Your Base Oils and Beeswax
Bring the double boiler water to a gentle simmer. Add your coconut oil and shea butter first, they'll melt within 3-5 minutes. Add beeswax pellets gradually; they take 8-12 minutes to melt. Stir occasionally but don't rush. Overheating above 185°F damages beeswax's emulsifying properties (peer-reviewed research).
Watch the temperature carefully, aiming for around 170°F. Remove from heat once everything is fully liquid and uniform. Let cool for 2-3 minutes until warm enough to pour smoothly but cool enough to hold your hand near the bowl comfortably.
Step 3: Add Active Ingredients and Essential Oils
Add 15-20 drops of peppermint oil, 10 drops of frankincense, 10 drops of myrrh, and 10 drops of ginger oil per batch. These amounts can be adjusted based on preference, but start conservatively.
Next, add 1/4 teaspoon of cayenne powder. Mix thoroughly but gently to avoid incorporating air bubbles. For sensitive skin, reduce cayenne to 1/8 teaspoon or omit it entirely, relying on essential oils for therapeutic benefit.
Let the mixture sit at room temperature for 30-60 seconds to allow volatile compounds to stabilize before cooling.
Step 4: Whip and Cool Your Cream
Pour your mixture into a clean glass bowl and refrigerate for 15-20 minutes until it reaches a soft-butter consistency. Remove and use an electric hand mixer on medium speed. The mixture will transform into a fluffy, mousse-like cream over 3-5 minutes.
Stop whipping when you reach your desired consistency, similar to store-bought body butter, thick enough to hold its shape but soft enough to spread easily. Transfer immediately to sterilized glass storage jars while the cream is still at this ideal consistency. Seal tightly.
Safety Precautions for Homemade Topical Analgesics
Making your own pain relief cream means you're responsible for safety in ways you wouldn't be with commercial products.
Patch Testing and Skin Sensitivity
Before applying your homemade pain relief cream to large areas, test it on a small patch of skin. Apply a dime-sized amount to the inside of your wrist or behind your ear. Wait 24 hours. If you experience redness, itching, burning, or any adverse reaction, you've identified a potential issue before it affects larger areas.
This is especially important with cayenne powder. Some people have heightened sensitivity to capsaicin and experience intense burning rather than therapeutic warmth. A patch test reveals this immediately.
For people with eczema, psoriasis, or radiation therapy-related skin sensitivity, patch testing is critical. Start with a formula that omits cayenne, using only essential oils. Once you've confirmed tolerance, you can gradually introduce capsaicin in future batches if desired.
Contraindications and Drug Interactions
Topical capsaicin can interact with certain medications and medical conditions. If you're taking blood thinners, NSAIDs regularly, or have open wounds, consult a healthcare provider before using a homemade pain relief cream containing cayenne.
Essential oils present their own considerations. Peppermint oil can interact with certain medications and may cause issues if you have gastroesophageal reflux disease. If you're pregnant, nursing, or have a serious medical condition, discuss your homemade pain relief cream with your healthcare provider before use.
Never apply your cream to broken skin, open wounds, or areas with active infections. If you experience persistent burning, swelling, or any concerning reaction after 2-3 applications, discontinue use.
How to Store Homemade Skincare Products
Your homemade pain relief cream contains no preservatives, so shelf life depends entirely on storage conditions.
Store your cream in a cool location, ideally between 60-70°F. A bedroom closet, bathroom cabinet away from heat sources, or a refrigerator works well. Heat accelerates oil oxidation, reducing therapeutic effectiveness. Never store near direct sunlight or heating vents.
Dark glass jars are superior to clear containers, as light exposure degrades essential oils and beeswax. Label your jars with the date made. Most homemade pain relief cream remains effective for 3-4 months at room temperature, longer if refrigerated.
Always use a dry spoon or applicator when removing cream. Never dip wet fingers directly into your storage container. If you notice mold, off-odors, or separation of oils, discard the batch.
Natural Alternatives to NSAIDs for Pain
Many people seek homemade pain relief cream as an alternative to nonsteroidal anti-inflammatory drugs. Topical pain relief works through local application rather than systemic absorption, affecting only the area where you apply it without impacting your entire body.
For localized pain, a specific joint, muscle group, or area of nerve pain, this targeted approach often delivers better results with fewer side effects. The trade-off is that topical treatments don't address systemic inflammation. If your pain stems from widespread inflammation throughout your body, oral supplements or medications might prove more effective.
Heat therapy works synergistically with topical creams. The warming sensation from capsaicin combined with external heat amplifies pain relief. Many people find that applying their homemade pain relief cream, then wrapping the area with a warm compress for 15-20 minutes, delivers relief comparable to over-the-counter pain medications.
Consistency matters more than intensity. Using your homemade pain relief cream twice daily for two weeks often produces better results than sporadic use.
Common Mistakes to Avoid When Making Pain Relief Cream
Overheating your base oils and beeswax is the most common mistake. Temperatures above 185°F damage therapeutic compounds. Use a thermometer, not guesswork.
Incorrect ratios create products that either don't set properly or absorb too slowly. The 1:1:1 ratio of coconut oil, shea butter, and beeswax is a proven starting point.
Adding essential oils while the mixture is too hot causes volatile compounds to evaporate, reducing effectiveness. Wait until the mixture has cooled to roughly body temperature before adding oils.
Under-whipping or over-whipping both create suboptimal textures. Whip for 3-5 minutes until you achieve a fluffy, mousse-like consistency, then stop immediately.
Contamination during storage ruins batches. Always use clean, sterilized jars and clean utensils. Never introduce water into your storage container.
Forgetting to patch test before full application leads to unnecessary skin irritation. Spend 24 hours testing on a small area first.
Making your own homemade pain relief cream puts you in control of every ingredient and its quality. Railroad Remedies (RXR) recognizes that some people prefer the certainty of professionally formulated products with verified potency and consistency. Our CBD and CBD/CBC pain relief lotions use organic coconut oil, shea butter, and essential oil principles, but with third-party testing, precise dosing, and formulations refined through extensive development. Whether you choose to make your own or opt for a pre-formulated option, the goal remains the same: effective, natural relief from pain and inflammation using ingredients you can trust.
Frequently Asked Questions
How long does homemade pain relief cream last?
Homemade pain relief cream typically lasts 2-3 months when stored properly in a cool, dark place in an airtight glass jar. The shelf life depends on your ingredients, organic coconut oil and beeswax are naturally shelf-stable, but essential oils can degrade over time. Store away from direct sunlight and heat to maximize potency. If you notice any discoloration, separation, or unusual odor, discard the batch.
What is the strongest natural anti-inflammatory ingredient for homemade pain relief cream?
Capsaicin, derived from cayenne powder, is one of the most potent natural anti-inflammatory compounds. It works by reducing substance P, a neurotransmitter that signals pain to the brain. Frankincense and myrrh essential oils also provide significant anti-inflammatory benefits. Ginger oil offers additional soothing properties. For optimal results, combine multiple ingredients rather than relying on a single source.
Are essential oils safe for topical pain relief?
Yes, when diluted properly in carrier oils like coconut oil, essential oils are safe for topical use. However, never apply essential oils directly to skin undiluted, they can cause irritation or burns. Always perform a patch test on a small area of skin 24 hours before full application. Avoid using essential oils on broken skin, open wounds, or near eyes. If you have sensitive skin from conditions like radiation therapy effects, start with lower concentrations and consult a healthcare provider.
Can I use homemade pain relief cream on my pet?
Most homemade pain relief creams are not safe for pets, as some essential oils and ingredients can be toxic when ingested through grooming. If you're interested in natural relief for your pet's arthritis or soreness, consult your veterinarian first. They can recommend pet-safe alternatives or suggest whether a professional-grade, veterinary-approved product is appropriate for your animal's specific needs.
This article was written using GrandRanker
